


In today’s fast-paced world, the integration of smart home devices has become a common solution for those seeking to enhance their living environments. Smart lights not only offer a convenient way to control your home’s lighting but also allow you to tailor the ambiance to fit your needs. This guide will help you navigate the journey of installing smart lights seamlessly, regardless of whether you’re a tech-savvy individual or someone just beginning to explore these innovative entities.
- Gather required tools, read the bulb manual, and ensure compatibility with your hub or protocol before starting installation.
- Choose proper bulb type and location considering sockets, Wi-Fi signal strength, and desired ambiance or security needs.
- Turn off power at the breaker and verify with a voltage tester for safe removal and installation of switches or bulbs.
- Follow device-specific wiring and app pairing steps; test controls, schedules, and voice assistant integration after restoring power.

Choosing the right smart light, such as the popular BR30 models from brands like Samsung or Apple, can seem challenging. With numerous options available on the market, it’s essential to understand which features are good for your situation. You might have questions about compatibility and the specific characteristics that different devices offer. This guide will address those queries while providing clear and concise instructions to help you get started.
Throughout the process, the emphasis will be on making it easy to operate smart lights efficiently. You’ll learn about everything from the necessary tools needed for installation to setting schedules, changing colors, and integrating your devices with voice assistants like Siri. By the end of this guide, you should be able to install your smart lights without any major hiccups, allowing you to enjoy the warm glow they provide while effortlessly creating the perfect atmosphere in your home.
Preparing for Installation

Before you begin the installation of your smart light, there are several actions you’ll want to take to ensure a smooth experience. First, gather all necessary tools and read the manual that comes with your Kasa or other smart bulb. Understanding the specific requirements for your device is absolutely crucial, as many smart lights may require different protocols to function correctly, such as Z-Wave or Wi-Fi.
Next, you should address any pre-existing light switches in your home. If you’ve previously installed smart switches that do not have a neutral wire, it’s important to check the compatibility with your new smart bulb. Some smart bulbs, especially those designed for older homes, might not perform well without this wiring. Additionally, be cautious of sticking with old switches that may force compatibility issues, leading to flickering or blinking lights.
In terms of installation conditions, make sure your workspace is comfortable and free from distractions. You’ll want to be able to fully focus on your actions during installation, so close those windows and turn off any noisy devices. If you’re using wireless models like those powered by Chromecast, take notice of the signal range; it’s vital for maintaining a bright, consistent experience.

Sengled WiFi Color Changing Light Bulb, Alexa Smart Light Bulbs that Compatible with Alexa & Google Assistant, A19 RGB No Hub Required, 75 W Equivalent 800LM...
When it comes time to physically install the bulb, gently tighten it into the socket without forcing it. It’s important these connections are secure but not overly tight, as it can cause damage. If you’ve got lots of lights to install, consider tackling them in separate categories to make the process manageable. There’s no rush; this is meant to enhance your home with the ultimate convenience of smart lighting!
With a little preparation, you will be ready to complete the installation in no time. Remember, the right smart bulb can make a significant difference in your living space, so take the time to set things up properly. Products like the Philips Hue White and Color Ambiance bulb or the Sengled Smart LED will absolutely transform your lighting experience for years to come.

Philips Hue A19 LED Smart Light Bulb - White and Color Ambiance - 60W Indoor Light Bulb - Control with Hue App - Works with Alexa, Google Assistant and Apple...
Gather Necessary Tools and Materials
Before diving into the installation of your smart lights, it’s essential to gather the necessary tools and materials to make the process as seamless as possible. It might seem daunting at first, but with the right items in hand, you’ll be doing things in no time. Start by checking that you have all the basic tools: a screwdriver–preferably with interchangeable bits–and a voltage tester to ensure everything is safe before you begin. If you’re working with overhead fixtures or hard-to-reach areas, consider having a ladder on hand for easy access.

You’ll also need smart lightbulbs that are compatible with your system, such as Leviton or Apple HomeKit-compatible bulbs. These options will allow you to control your lighting conveniently using your mobile device or voice commands with platforms like SmartThings. Make sure to choose the right type of socket for your installation–whether it’s a standard socket, bayonet, or a multi-way setup. Each of these holds different benefits and is suited for different environments, like porch lights or indoor lamps.
![SmartThings Hub 3rd Generation [GP-U999SJVLGDA] Smart Home Automation Hub Home Monitoring Smart Devices - Alexa Google Home Compatible - Zigbee, Z-Wave, Cloud to Cloud Protocols – White](https://m.media-amazon.com/images/I/614d2lQP0hL._SS520_.jpg)
SmartThings Hub 3rd Generation [GP-U999SJVLGDA] Smart Home Automation Hub Home Monitoring Smart Devices - Alexa Google Home Compatible - Zigbee, Z-Wave,...
In addition to the lightbulbs, verify you have a smart hub if needed, as it helps manage multiple devices using protocols like MQTT. This is particularly useful for reporting status and controlling your advanced lighting setup throughout the night. Having this central hub will enable you to seamlessly command all your devices even if they’re connected across multiple sockets. Adding smart light strips could also enhance visual comfort in your living space, creating dynamic ambiance whenever you wake up or unwind.

Finally, gather any installation accessories such as wallplates, back-boxes, and covers to ensure a clean finish. For example, have a specific cover for your light fixture which will help integrate it nicely with the decor of your home. With everything you need at hand, you can take on the task confidently, knowing there’s a reliable process that will transform your normal lighting setup into an advanced smart system.
Select the Right Location for Your Smart Light
Selecting the right location for your smart light is essential for achieving the best illumination and functionality. First, consider the specific areas in your home that require lighting improvements. For example, living rooms often become the central gathering spot, making it a perfect place for color-changing lights that can enhance the ambiance during gatherings or quiet evenings. Smart lights compatible with HomeKit or IFTTT can be useful here as they allow you to control them via your smartphone or voice commands.
When choosing a spot, think about the electrical circuits and back-box configurations in your home. If you are installing a single bayonet bulb, make sure the current setup is compatible to avoid any negative issues during installation. Also, pay careful attention to the router placement; having a strong Wi-Fi signal ensures that your smart lights respond promptly, even if you are far away from the main hub.
Additionally, monitor your surroundings. If you live in places like Los Angeles where burglary rates are higher, installing smart lights with timers can act as a reliable solution to make your home look occupied, which may deter potential burglars. For those years when you wish to add extra security, consider using smart lighting systems with advanced protocols to enable remote access.
Now, let’s take a look at some great products available on Amazon. The Philips Hue White and Color Ambiance Smart Bulb is a fantastic choice for anyone looking to add dynamic lighting. Another option is the LIFX Mini Color Smart Light, which is easy to install and provides vibrant colors. Both options offer compatibility with various platforms, ensuring they become a seamless companion in your smart home setup.

LIFX Color, A19 800 lumens, Wi-Fi Smart LED Light Bulb, Billions of Colors and Whites, No Bridge Required, Compatible with Alexa, Hey Google, HomeKit and...
In conclusion, choosing the right location and considering all conditions for your smart light installation will not only improve your home’s illumination but also provide added security. Carefully evaluate your needs, invest in reliable products, and you’ll enjoy all the benefits of smart lighting for years to come.
Turn Off Power to the Existing Fixture

Before you start installing your new smart light, it’s essential to turn off the power to the existing fixture. This step is crucial not only for your safety but also to ensure a smooth installation process. You’ll typically find the light switch controlling the fixture, but for a more reliable approach, consider turning off the circuit breaker at your main electrical panel. Speaking of being safe, this is a task that shouldn’t be left poorly executed!
Once you’ve switched off the power, it’s good practice to monitor the socket with a voltage tester. Doing this will give you the true peace of mind, ensuring that the area is completely free of electrical charges before you begin screwing in your new smart light. Many smart lighting modules on Amazon, like the Philips Hue White and Color Ambiance A19 LEDs, are designed to fit seamlessly into existing fixtures, allowing for easy automation and dimming while offering a warm glow that transforms your space.

Automation is one of the significant benefits of smart lighting. In implementing these technologies, you can quickly sync your lights to a schedule, enabling them to switch on and off throughout the day without the boring manual operation. You can even create profiles to adjust the lighting depending on the activity–movies, reading, or dining. This capability is perfect for busy areas where comfort and convenience matter the most.
Additionally, if you’re worried about your budget, there are plenty of options out there that won’t break the bank. For instance, the Wyze Bulbs are a great buy, providing excellent features at an affordable price. They offer dimming abilities and can be automated to work with voice assistants like Alexa and Google Assistant, making your life much easier.

Wyze Lifestyle Bulb Color, 1100LM Wi-Fi A19 Smart Bulb, 16 Million Colors & Tunable White, Works with Alexa and Google Assistant, 75W Equivalent, Dimmable,...
In summary, before installing your smart light, remember these considerations for turning off the power. A little attention can bear significant effects! This ensures that your installation goes smoothly, allowing you to enjoy the numerous benefits of your new smart lighting system, perfectly paired with your lifestyle and needs.
Connecting the Lutron Aurora Smart Light
Connecting the Lutron Aurora Smart Light is usually a simple process, making it easier for you to enjoy the benefits of smart lighting in your home. This device works by bridging the gap between traditional light switches and smart home protocols, allowing you to control your lights using your smartphone or voice assistants like Apple HomeKit and Chromecast. It gives you the flexibility to select different settings for various conditions–whether it’s a movie night, a party, or a wake-up routine.
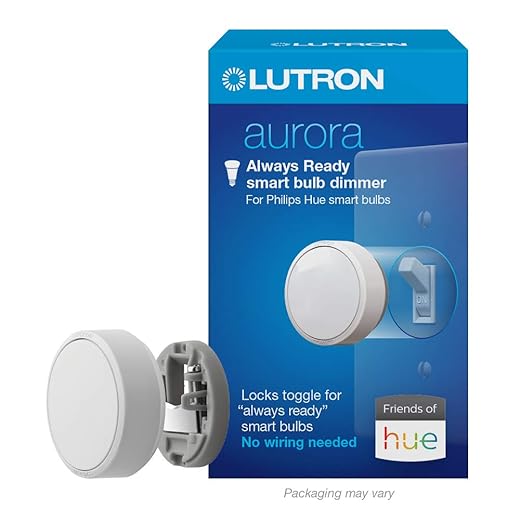
Lutron Aurora Smart Bulb Dimmer Switch | for Philips Hue Smart Bulbs | Z3-1BRL-WH-L0 | White
To get started, you’ll need to ensure that the Lutron Aurora is ready for installation. First, remove any existing light switch covers to expose the pattress, then carefully attach the Aurora to the existing switch. This process is required if you want to maintain control over your older, non-smart lights. The device uses a negative input signal, which means it will work seamlessly with your traditional switch, so you won’t have to worry about rewiring or complex setups.
Once installed, the Aurora allows for multiple options in terms of light effects. You can create ambient strips of light for decorating or energized bright lighting for when you need to be active. Three adjustable settings will likely give you exactly what you need. Plus, with the ability to control the smart light via a smartphone app, you’ve got everything at your fingertips, making the entire experience feel more connected.
For those planning to enhance their home, the Lutron Aurora is a great solution that doesn’t require major changes. Just think about how much easier it will be to wake up in the morning with a soft glow, or how great it will be to instantly switch your lights off with a single tap on your smartphone. This smart light will constantly work to support your lifestyle and create the perfect atmosphere, no matter the condition.
For purchasing, consider checking out options on platforms like Amazon, where you can find the Lutron Aurora Smart Bulb and similar products that fit your needs. Remember to check the reviews and see how others have benefited from integrating smart lighting into their spaces!
Remove the Old Light Switch
Removing the old light switch is a crucial step in your journey to install a smart light. Begin by turning off the power at the circuit breaker to avoid any negative situations that might happen. Once you’re sure the power is off, check with a voltage tester to confirm that there is no electricity flowing to the switch. This is where safety comes first. You wouldn’t want any damage to occur during the installation process.
Next, remove the switch plate cover by unscrewing it. After that, you can remove the screws holding the old switch in place. Carefully pull the switch out of the wall box. You might need to gently disconnect the wires from the old switch; remember to take note of how they are connected, or even take a picture for reference. If your setup includes a three-way switch, be sure to check which wires are for the traveler connections, as that will be important during the installation of your new smart switch.
Once the old switch is removed, it’s a great time to check the wall box for any frayed wires or damage that might need addressing before moving to the next stage. If everything looks good, you’re ready to install your new smart switch. Many reliable companies offer smart switches that come in a wide range of styles, colours, and tones to match your home decor. For example, the Leviton Decora Smart Wi-Fi Dimmer is a versatile option that connects easily to your system, plus, it’s compatible with Apple HomeKit, giving you comprehensive control from your phone.

Leviton Decora Smart Dimmer Switch, Wi-Fi 2nd Gen, Neutral Wire Required, Works with Matter, My Leviton, Alexa, Google Assistant, Apple Home/Siri & Wired or...
Getting your smart switch installed will save energy and give you the ability to adjust brightness levels remotely using your phone. Companies like Lutron and Philips Hue also provide excellent options backed by user-friendly protocols, such as Z-Wave, making compatibility with your smart home system a breeze. These modern devices are specifically designed to bridge the gap between convenience and functionality within every home.
Questions and answers:
What tools do I need to install a smart light?
To install a smart light, you typically need a few basic tools: a screwdriver (usually a flathead or Phillips), wire strippers, and possibly a voltage tester to ensure that the power is off before you start working. Having a ladder on hand can also be helpful if you’re installing lights in high places.
Can I install a smart light myself, or do I need a professional?
You can often install a smart light yourself if you feel comfortable working with electrical fixtures. Many smart lights come with clear instructions designed for DIY enthusiasts. However, if you are uncertain about handling electrical components or local regulations, hiring a professional might be a safer option.
What are the steps involved in installing a smart light?
The steps to install a smart light generally include: 1) turning off the power at the circuit breaker, 2) removing the existing light fixture, 3) connecting the smart light according to the instructions provided, which usually involves wiring the smart light to the ceiling wires, 4) attaching the new light fixture to the ceiling, and 5) restoring power and testing the installation. Be sure to consult the specific manual for your smart light model as instructions may vary.
Do smart lights require a special type of bulb or fixture?
Smart lights usually come as integrated fixtures or as smart bulbs that can replace standard light bulbs in existing fixtures. If you’re using smart bulbs, they typically fit into standard sockets, but make sure to check the wattage and compatibility with your existing fixtures. Some smart lighting systems may need specific types of bulbs like LED or have particular specifications laid out by the manufacturer.
How can I connect my smart light to my home Wi-Fi?
To connect your smart light to your home Wi-Fi, you’ll first need to download the corresponding app for your smart lighting system. Open the app, create an account if necessary, and follow the instructions to add a new device. Usually, this involves putting the light into pairing mode and selecting your Wi-Fi network. Ensure you have your Wi-Fi password ready, as you’ll need it for this step. Make sure your smart light is within range of your Wi-Fi signal for a smooth setup.


